Swing Tutorial - 02 - Creating a Label on a Window.
This tutorial will teach you how to create a text label on a Window frame in Java Swings.
Label: Label is a static text on a window. Like a title to something. Though you can make it change also when required but most of the time it is static.
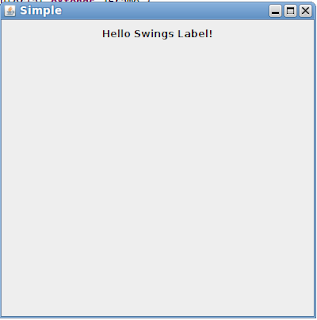
Final output will look like this:
 Follow the steps:
1. Open any Java IDE such as Eclipse or Netbeans.
2. Create a New Project and name it anything such as:
"Swing Tutorials"
or
"Swing Practice"
or
any name that you like to give it.
3. Create a Class in the default Package of the Project that you created and name it
"LabelTutorial"
A class will be automatically created which will have some boilerplate code that you write when you create a class in Java. It will look like this:
=============================================
public class LabelTutorial {
}
=============================================
4. Now write the following code in this class as it is without changing any variable name. But please do not copy paste it. By copy-pasting you will not learn anything.
=============================================
import java.awt.FlowLayout;
import javax.swing.JFrame;
import javax.swing.JLabel;
import javax.swing.JPanel;
public class LabelTutorial extends JFrame {
JLabel label1;
public LabelTutorial()
{
super("Simple");
setLayout(new FlowLayout());
JPanel panelObj = new JPanel();
label1 = new JLabel("Hello Swings Label!");
panelObj.add(label1);
add(panelObj);
}
public static void main(String[] args) {
LabelTutorial lt = new LabelTutorial();
lt.setDefaultCloseOperation(JFrame.EXIT_ON_CLOSE);
lt.setSize(400,400);
lt.setVisible(true);
}
}

Label: Label is a static text on a window. Like a title to something. Though you can make it change also when required but most of the time it is static.
Final output will look like this:

1. Open any Java IDE such as Eclipse or Netbeans.
2. Create a New Project and name it anything such as:
"Swing Tutorials"
or
"Swing Practice"
or
any name that you like to give it.
3. Create a Class in the default Package of the Project that you created and name it
"LabelTutorial"
A class will be automatically created which will have some boilerplate code that you write when you create a class in Java. It will look like this:
=============================================
public class LabelTutorial {
}
=============================================
4. Now write the following code in this class as it is without changing any variable name. But please do not copy paste it. By copy-pasting you will not learn anything.
=============================================
import java.awt.FlowLayout;
import javax.swing.JFrame;
import javax.swing.JLabel;
import javax.swing.JPanel;
public class LabelTutorial extends JFrame {
JLabel label1;
public LabelTutorial()
{
super("Simple");
setLayout(new FlowLayout());
JPanel panelObj = new JPanel();
label1 = new JLabel("Hello Swings Label!");
panelObj.add(label1);
add(panelObj);
}
public static void main(String[] args) {
LabelTutorial lt = new LabelTutorial();
lt.setDefaultCloseOperation(JFrame.EXIT_ON_CLOSE);
lt.setSize(400,400);
lt.setVisible(true);
}
}
=============================================
Your final file should look like this in Eclipse IDE

5. Now click on the run button in the eclipse which looks like a Green Play button  .
.
Your Frame will open as shown in the first picture.
.Your Frame will open as shown in the first picture.
Now you have written all the code. Ran your Java program successfully .
Now comes the time to explain it.
Now comes the time to explain it.
import java.awt.FlowLayout;
import javax.swing.JFrame;
import javax.swing.JLabel;
import javax.swing.JPanel;
import javax.swing.JFrame;
import javax.swing.JLabel;
import javax.swing.JPanel;
All the above statement imports the required classes.
FlowLayout: It is a way of arranging swing components on the screen. FlowLayout is the simplest of all. It just add components one after another in a linear fashion.
JLabel: This is class which is used to create the label that we gonna create i.e. the static text.
JPanel: Now this is interesting. Panel is actually a sub-frame. You can put multiple panels in a Window, a panel in a panel. We will use it in many different ways in later tutorials. So do not worry.
JLabel label1;
This creates a reference to a label object. We will initialize it later and add text to this label.
setLayout(new FlowLayout());
Now this line sets the layout of the Frame to be FlowLayout. It is a simple Horizontal arrangement of components.
JPanel panelObj = new JPanel();
This creates a object of JPanel class. You can add other Swing Components such as Labels, Buttons etc etc on a Panel.
label1 = new JLabel("Hello Swings Label!");
We have initialized the Label object and have assigned the text that we want to show in the lable. The constructor of JLabel class takes a string text as a argument which is shown as Label on the Window.
panelObj.add(label1);
This line adds the label into the Panel object that we creates and initialized earlier.
add(panelObj);
This adds the panel to the Frame of the window.
This is the only new code that you need to know what it is doing. For any questions and queries ask in the below comments sections. If there is any suggestions regarding the improvements of the tutorial please comment, I would love to improve.


Good One
ReplyDeleteThanks alot
DeleteThankss for writing
ReplyDelete